
Hey everybody, Mike Uhrlaub with another episode of Power Your Life and today we are going to discuss Part 5 of “Movements That Heal Back Pain.” But as always before we get started I like to share a little bit about what’s going on in my life. The other weekend I had an experience with my family. We recently got snow so you now we can’t go for a hike as easily, so we decided we needed something to entertain ourselves now that it’s winter. So we decided we would start putting a jigsaw puzzle together. I picked up a 1000-piece jigsaw puzzle, and when I bought it, I didn’t think it would be all that hard.
I quickly realized how incredibly hard these things are. When I got the puzzle home, we opened the box and laid all of the pieces on the table. When I saw it laid out, I thought, “Oh no, what have we gotten ourselves into?” It was a lot of pieces! As I looked at all of those pieces, I started feeling kind of lost. I just didn’t know where to start.
First Things First…
I remembered watching a movie one time; In the movie, the characters were entertaining themselves. They had a hobby of putting jigsaw puzzles together and I remembered these characters would always start by finding all the border pieces to create the border first. I thought it made sense so we started separating all the border pieces into their own pile and I realized that step gave me direction. It helped me make sense of all those crazy looking pieces. It didn’t take long before we started putting it together; The borders of the puzzle started taking shape. As we’ve gradually been working on this puzzle it kept me thinking that putting a puzzle together is a lot like life.
In life, our problems can seem like puzzle pieces all jumbled together on the table. Nothing seems to fit or makes sense. For most of us, this can make a problem we’re facing seem incredibly overwhelming and too big to handle. The next thing you know, you start feeling lost. That’s when anxiety starts to take hold. The more you look at things, the bigger the problem can seem. But, when you take a step back from the problem and ask yourself, what is it I need to do first? What is the one thing I need to do? You don’t have to do anything else. You don’t have to know anything else; Just focus on that thing. We call it first things first, just focus on that.
Once that is done, you can start thinking about the next step. Ask yourself, what’s the next right thing I should be doing. Once you answer that question, you start working on the next action. You do the next right thing.
Piece by Piece
If you continue this process you start to realize your problem is starting to get taken care of. You’re putting that puzzle together; The overwhelming feeling and anxiety are slowly eliminated. It’s all about breaking up the problem in smaller pieces so they can be handled one at a time. You may not know all of the steps, but finding a place to start and focusing on that action until it’s complete will give you the direction you need to solve the problem.
Try this approach on your next problem, task, or project that seems completely overwhelming. Just remember first things first. Once you get that done, what’s the next right thing.
Alright, let’s get to the Movements That Heal Back Pain…
Over the last several episodes, I’ve been showing you all some of my best movements I found to heal back pain. I use these movements in the clinic to help heal back-pain for my clients.
You might be wondering…. Which one should I start with? Which one do I do next? How do I use them all together? Those are all great questions and it can seem kind of confusing. I know, all of this information and things can seem overwhelming. It’s a lot like the experience I was just describing with the jigsaw puzzle. Today you’re in for a real treat because I’m going to show you exactly how to put these movements together, what order to put them in, and how to create this amazing home back program for your pain.
Before we get into that, I want to do is revisit the basics of these movements. The movements that heal back pain have to hit the key muscle groups that contribute to back issues. They also have to work multiple muscle groups at the same time and prime your nervous system. They have to be capable of creating structural change in your body. These movements I’m about to show you are ones I’ve already done. I’m just going to show you in what order to put them in.
Things to Remember
- Never hold your breath. I just finished sharing how breathing is important. It activates and primes your nervous system. Never hold your breath!
- Always keep your abdominal muscles and midsection engaged. Just tighten them by pulling your belly button in towards your spine
- Never force into your primary pain. Muscle soreness may be created from the movement, but if your primary pain levels increase, stop. Primary Pain is the day-to-day back pain. Put a number on your daily back pain and if that increases after these exercises, stop. Do not go above two points of your normal primary pain. A correct movement will decrease the pain, not make it worse.
- Make sure you challenge yourself. Once you get the movement down and feel really good with it, work it to the point where you feel, at LEAST, 40% challenged. If you’re not, it’s pointless and you won’t gain much from it.
Multifunctional Movement Flow – The best way to use all of these movements to heal back pain is to string them together.
(It’s what we refer to it in the clinic)
Start out with your two warmups: Swing Kicks and the Warrior One movements.
- Gets the muscular warmup, starts priming your nervous system, and gets your body ready!
- You do your warmups one time
After your warmups you move to what we call The Actual Work Set. This is comprised of the three movements that creates one cycle.
The Actual Work Set: Bird-Dog Crunches, Dragon Pose, followed by the Duck-Unders.
- When we do these in the flow, we’re doing all of them for 40-seconds on each side. Once each side is completed, you’ve finished one cycle and start on the next one in the same order.
These movements are so great because you can do them anywhere. You don’t need a large space. Do them in your living room, bedroom, at a hotel, and while you’re on vacation!
Things You Might Need
- Yoga Mat
- Stretch band/synergy bands (You can order these on Amazon)
- Yoga blocks
- Duct tape over a doorway at about shoulder height
- Timer
First Warmup – Swing Kick
- A dynamic stretch warmup exercise that actively helps stretch your hamstrings and hip flexors.
- Works your core and improves balance. Mobilizes the sciatic nerve while working your cardiovascular system.
- Set yourself up in a running position with your hands in a fist; You will essentially be in a defensive boxing position. You want to make sure you have a slight bend in your knees.
- Start out with a set of 10 on each leg repeating the set twice.
- Remember to keep your belly button in so you engage your core.

Step 1: Set yourself up in a running position with your hands in a fist, one leg forward and one leg back; You will essentially be in a defensive boxing position. You want to make sure you have a slight bend in your knees.

Step Two: Engage your core, take your back leg, keep your leg straight, and swing it forward. Keep your front knee slightly bent and the ‘swing’ leg straight. Swing it as high as you can 10 times on each leg twice.
- Start out slow with a low kick and work yourself up.
Notes:
- The first time you do this, you’re probably not going to go very high.
- You’re going to feel a pretty good stretch in the hamstring.
- Don’t overdo it, but as you get warmed up, you can start swinging and a little bit higher and faster.
- Work on the height.
- Breathe in through the nose and out through the mouth.
- The other side, none swinging side, is going to work your hip, core, and (most importantly) mobilize the sciatic nerve.
Second Warmup – Warrior One
- Start off in a running stance with one foot in front and the other behind.
- Keep the back leg straight and slowly bend the front knee.
- Don’t let your knee shoot out in front of the toes. If you cannot see your toes, you’ve bent your knee too far.
- Keep your back leg straight.
- Set your glutes. Tighten the old butt cheeps together; Just think about squeezing those tight. It helps tilt your pelvis back and tuck your tummy in.
- Doing this helps stretch your psoas muscle, work your quads, heal back pain, and fix your balance.
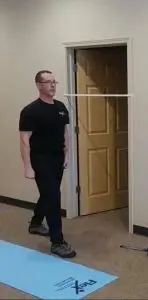

Step 1: Keep an upright running position. Tighten your core and glute muscles. Remember, keep both feet on the ground and do not bend your front knee too much.
Step 2: Take both of your arms and raise them up. Much like a referee giving a touchdown signal. Squeeze your shoulder blades together and hold. Make sure your front knee is still bent, glutes are still tight, and gaze straight ahead. Just pick a spot on the wall and stare at in. Do this for 30 seconds. It helps to have a timer.
Step 3: After 30 seconds bring your arms down. Straighten the legs. Step back. Repeat on other side!
Note: Just like the first warmup, do this twice; 30-seconds on each side. Eventually you will get so good you will be able to hold for a full minute!
Work Set
You don’t have to have a yoga mat for your work set but it does help to have a little bit of cushion when you go down on all fours.
Bird-Dog Crunch
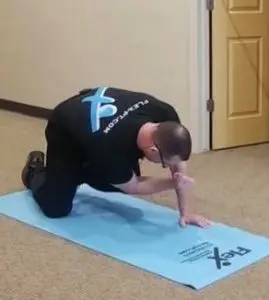
Step 1: Get down on all fours. Bring one arm and one leg together. They have to be opposite of each other. Make sure your eyes follow your hand. When you bring your elbow and knee together, look down.

Step 2: Once your Elbow and Knee touch, kick them both straight out. Make sure your head follows the motion and look forward.
Notes
- 40 Seconds on each side.
- This movement is going to work your lower abdominals, lats, thoracolumbar fascia, and glutes. It will challenge your nervous system, cardiovascular system, and balance. Please be careful!
- Don’t ever sacrifice the quality of the movement for your speed or the quantity. Always focus on your form.
Dragon Pose

Step 1:
Start off by going down on all fours; also known as the table top position.
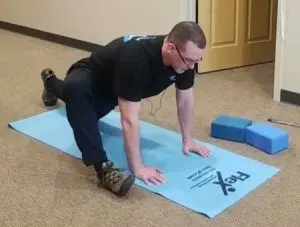
Step 2:
Starting with the right foot, bring it up to where it is even with your hand.
Step 3:
Let your right knee fall to the side a little bit and roll your foot on its side.
Step 4:
Take your back leg (left leg) and slide/walk it backwards. You may feel a stretch starting in this step. (In your hip, flexor, and groin).
Step 5:
This step is if you would like to get a little more advanced. If you are uncomfortable doing this now, keep trying steps 1-4 and come back to this step in a couple of weeks.

Note:
- Ultimately you can go all the way down to your elbows, but if you can’t, the yoga blocks come in handy. You can pick these up on Amazon, Scheels, or Dick’s Sporting Goods.
- If you can’t quite go up on the toes, that’s okay, just leave your knee on the mat.
- Breathe in through the nose and out through the mouth for about 40-seconds on each side; Then return to table top.
Duck-Unders
- If you are going to use synergy bands, don’t put them on standing on. You could lose your balance and fall. Safety is important.
- These really work your glutes, quads, and tummy if you tuck it in! Always engage your core muscles. This movement also helps support the back.
- Start off with the tape shoulder height.
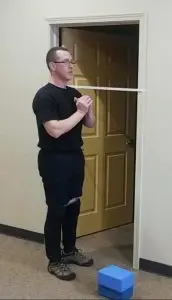
Step 1: Stand next to the taped doorway. From here, step under the tape.
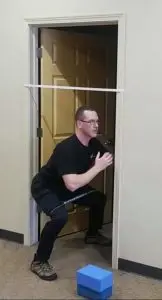
Step 2: Keeping your shoulders square, body upright, and head up, squat under the tape. Everything should be level

Step 3: Stand up straight on the other side of the tape. Make sure to keep your shoulders square and head up. When you get to the top, make sure you are squeezing your glute muscles so they stay engaged.
Notes:
- Do not bend your body because then you are not working your hips.
- Do not dip your head.
- To make the movement harder, lower the tape.
- If it is too hard, raise the tape up.
- Do these for 40-seconds and then increase your speed.
- Remember, do not take the band off standing up. Sit Down!
There you have it! That would constitute one cycle. Now, what you would do is you would go back for the second cycle, Bird-Dog Crunches, Dragon Pose, and Duck-Unders. That would be cycle number two. Cycle number three is the same thing, Bird-Dog Crunches, Dragon Pose, and Duck-Unders.
You should strive to work up to where you can do three to four cycles comfortably. Then you can start increasing the intensity.
Don’t ever sacrifice the quality of the movement.
Trust me when I say this will give you a great back workout. We use it in the clinic all the time. It’s a very helpful flow. It’s going to hit all of the right muscle groups in the correct synergy. If you’re working yourself correctly, you’re going to be able to break a light sweat too. It’s not going to take long and you’re soon going to notice improve with your movement, balance, and coordination. Most of all, you’re going to start feeling less back pain!
If you find it that it’s too hard at first, be patient and take it slow. Keep those movements small. You may have to do the modifications, but if you keep at it I promise, it will get better. One thing I want you to remember is just because you can’t do it today, doesn’t mean you won’t be able to do it tomorrow.
The key is to be consistent and persistent. Just to keep plugging away at it.
Want to check out these multifunctional movements more?
Follow the links to their specific episodes of Power Your Life!
If you would like to know how you should be breathing during each movement, watch my Just Breathe episode HERE!
If you’re having back pain and would like to not only find out the root cause but want to fix things for good, then sign up for our new breakthrough back pain exam. Just click on the link to find out more about this amazing new program we’ve put together. Check it out HERE!
And as always, I’m going to leave you with a thought-provoking quote. This time from Helen Keller. “We can do anything we want to, if we stick to it long enough.”
I’m going to let you ruminate on that one.
Until next time. Power Your Life and keep moving forward!
